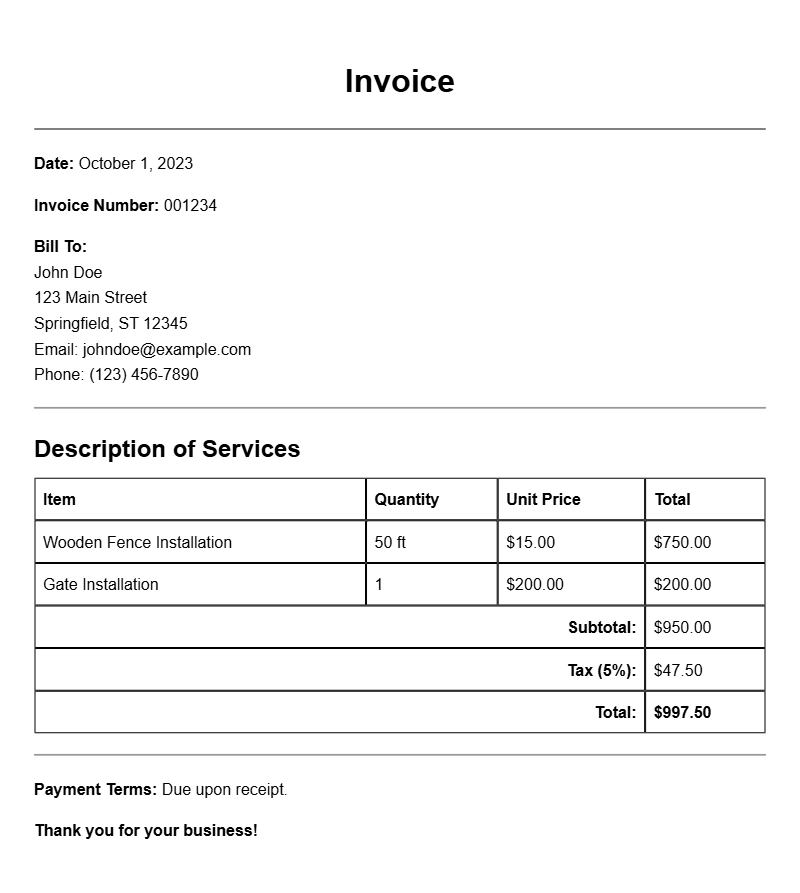
When you finish a fence installation job, one of the last things on your mind might be creating an invoice. Yet, a well-prepared fence installation invoice is essential for maintaining professionalism and ensuring you get paid on time. This article will guide you through everything you need to know about crafting effective fence installation invoice samples.
WHAT IS A FENCE INSTALLATION INVOICE?
A fence installation invoice is a document that details the services you provided, the materials used, and the total cost for a fencing project. It serves as a formal request for payment and is crucial for both record-keeping and tax purposes. This document helps clarify the scope of work for your client and protects you in case of disputes.
WHEN IS IT USED?
You’ll need to issue a fence installation invoice after completing a job, ideally before you receive payment. It can be used for both residential and commercial projects. Whether you’re working on a backyard fence or a large perimeter fence for a business, having an invoice helps build trust and ensures clarity regarding the work performed.
KEY COMPONENTS OF A FENCE INSTALLATION INVOICE
- Your Business Information: Include your name, address, phone number, and email.
- Client Information: Add the client’s name and address.
- Invoice Number: Unique identifier for tracking purposes.
- Date of Issue: When the invoice is created.
- Description of Services: Detailed list of services provided.
- Materials Used: Breakdown of materials and their costs.
- Total Amount Due: Clear statement of the total cost.
- Payment Terms: Include due dates and accepted payment methods.
STEP-BY-STEP WRITING GUIDE
Creating a clear and effective invoice can be simple if you follow these steps:
- Gather Information: Collect all necessary information from the job, including client details and services rendered.
- Choose an Invoice Template: Use a basic template that fits your style. You can find editable templates online.
- Fill in Your Business Information: Start with your details at the top of the invoice.
- Add Client Information: Ensure you accurately input your client’s name and address.
- Detail Your Services: Describe what services you provided, like “installed 200 feet of vinyl fencing.”
- List Materials and Costs: Include a breakdown of materials, like “wood posts – $300, fencing panels – $800.”
- Calculate the Total: Sum everything up and display the total amount due.
- Specify Payment Terms: State when payment is due and how it can be made.
REALISTIC EXAMPLES/TEMPLATES
Here’s a simple invoice template you can customize:
Your Business Name
Your Address
Your Phone Number
Your Email
Client Name
Client Address
Invoice Number: 001
Date of Issue: [Insert Date]
Description of Services:
– Installed 200 feet of vinyl fencing
– Included labor and disposal of old fencing
Materials Used:
– Wood Posts: $300
– Vinyl Panels: $800
– Labor: $400
Total Amount Due: $1500
Payment Terms: Due within 30 days. Accepting checks and bank transfers.
COMMON MISTAKES TO AVOID
- Not including all relevant details, which can lead to confusion.
- Forgetting to assign an invoice number, making it hard to track payments.
- Setting vague payment terms that can delay payment.
TIPS FOR CUSTOMIZATION
Tailor your invoice to reflect your brand. You might want to add your logo or choose specific colors that match your company’s aesthetic. Consider including a personal note thanking your client for their business. This small touch can help foster long-term relationships.
Creating a fence installation invoice doesn’t have to be a daunting task. With a little organization and the right template, you can ensure that you get paid promptly while maintaining a professional image. For more examples, you can check out hair stylist invoice templates or video production invoice samples to see different styles and formats.
Practical Document Examples