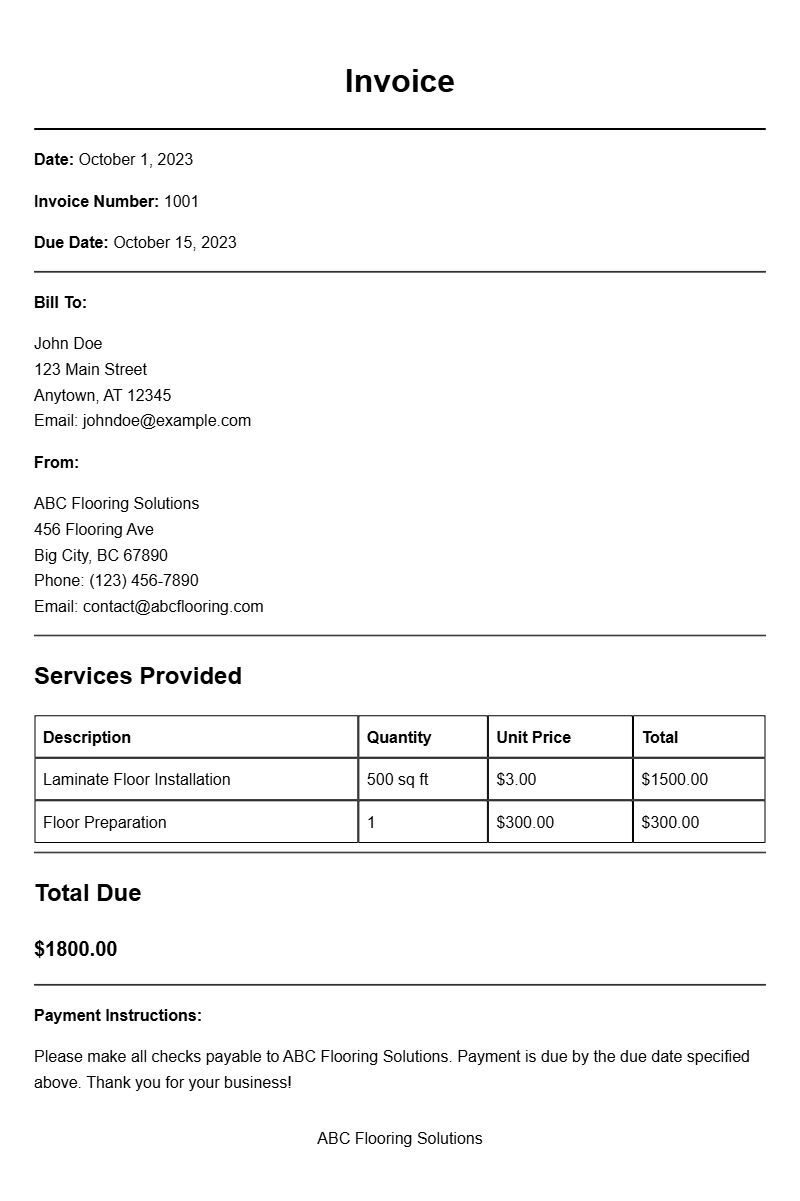
As a floor installer, you know that invoicing is an essential part of running your business. Having a clear and professional invoice not only helps you get paid on time but also reinforces your brand in the eyes of your clients. If you’re looking for floor installer invoice samples, you’re in the right place. This guide will help you understand what an invoice should include, when to use it, and provide you with templates to make your life easier.
WHAT IS A FLOOR INSTALLER INVOICE?
A floor installer invoice is a document that outlines the services provided to a client, the materials used, and the total amount due for payment. It serves as a formal request for payment and helps keep your financial records organized. The invoice should detail all relevant information to avoid confusion and ensure timely payment.
WHEN IS IT USED?
You typically use an invoice after completing a flooring project or when delivering materials. It is crucial to send the invoice promptly to maintain cash flow and keep your business running smoothly. Sending an invoice right after the job helps clients remember the quality of your work, making them more likely to pay quickly.
KEY COMPONENTS OF A FLOOR INSTALLER INVOICE
An effective invoice includes the following sections:
- Your Business Information: Include your business name, address, phone number, and email.
- Client Information: List the client’s name, address, and contact details.
- Invoice Number: Assign a unique invoice number for tracking purposes.
- Date of Issue: The date when the invoice is created.
- Due Date: Specify when payment is due.
- Description of Services: Detail the work performed, including materials used.
- Costs: Break down the costs for labor and materials, including any taxes.
- Total Amount Due: Clearly state the total payment required.
- Payment Instructions: Include information on how the client can pay you.
STEP-BY-STEP WRITING GUIDE
- Gather Your Information: Start by collecting all details related to the job, including the client’s information and specifics of the work done.
- Create a Template: Use a word processor or spreadsheet to create an invoice template. You can also find online invoice generators.
- Fill in the Details: Input all the relevant information, ensuring accuracy in descriptions and numbers.
- Review for Errors: Double-check the document for any mistakes before sending it out.
- Send the Invoice: Email or print and mail the invoice to the client, depending on your agreement.
REALISTIC EXAMPLES AND TEMPLATES
Here’s a simple template you can adapt:
Your Business Name
Your Address
City, State, Zip
Phone Number
Email Address
Invoice Number: 001
Date of Issue: [Date]
Due Date: [Date]
Bill To:
Client Name
Client Address
City, State, Zip
Description of Services:
– Floor Installation – [Type of Flooring]: $[Cost]
– Materials: $[Cost]
– Labor: $[Cost]
Subtotal: $[Subtotal]
Tax (if applicable): $[Tax Amount]
Total Amount Due: $[Total]
Payment Instructions: Please make checks payable to [Your Business Name].
COMMON MISTAKES TO AVOID
- Skipping the invoice number, which helps with organization and tracking.
- Not providing clear payment instructions, leading to delays in receiving payment.
- Failing to specify the due date, which can create confusion.
- Overlooking tax regulations in your area; ensure compliance to avoid issues.
TIPS FOR CUSTOMIZATION
Make your invoice stand out by customizing it with your logo and brand colors. Use a clear and readable font to ensure all information is easy to understand. Consider including a thank you note or a small discount for future services to encourage repeat business.
Creating an effective floor installer invoice doesn’t have to be complicated. With the right template and attention to detail, you can streamline your invoicing process and keep your business thriving. For more invoice examples, you can check out samples for other professions like SEO service providers or credit repair specialists.
Editable Document Format Examples