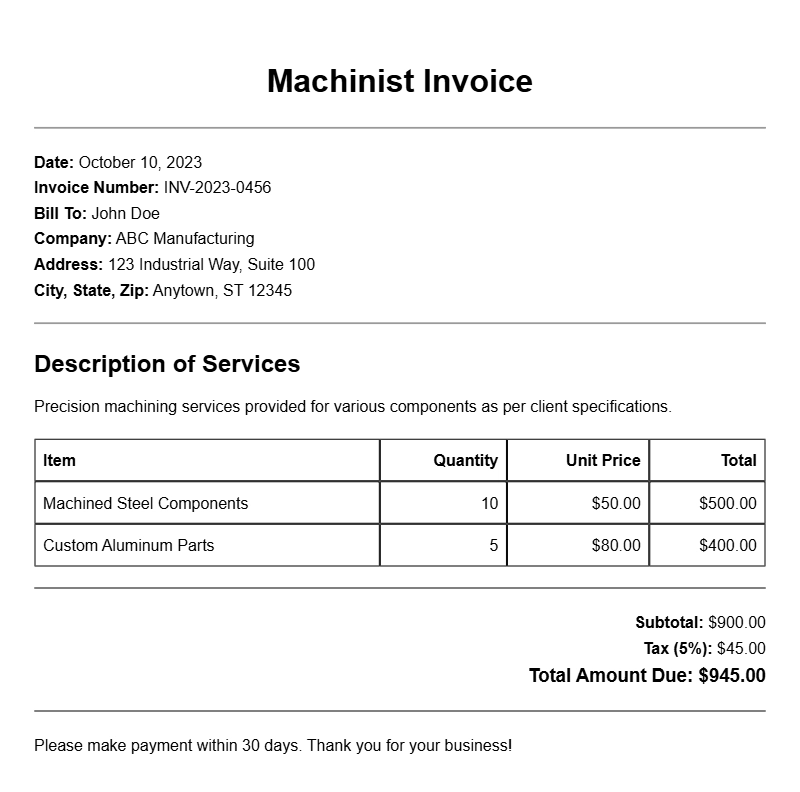
If you’re a machinist or running a machine shop, keeping track of your work and billing clients accurately is essential. One of the best ways to do this is by using a machinist invoice. This document not only helps you get paid but also maintains a professional image. Here’s a practical guide on machinist invoice samples to help you create your own.
Understanding Machinist Invoices
A machinist invoice is a detailed document that outlines the services you provided, the materials you used, and the total amount due from your client. It serves as a formal request for payment after delivering your machining services. Invoices are often required for record-keeping, tax purposes, and ensuring a clear understanding between you and your clients.
When to Use a Machinist Invoice
You should use a machinist invoice whenever you complete a job for a client. Whether it’s a one-time project or ongoing work, sending an invoice helps you track payments and maintain a professional relationship. For instance, if you machined parts for a local manufacturer, an invoice clarifies what services were rendered and the costs involved.
Key Components of a Machinist Invoice
Every machinist invoice should include the following sections:
- Header: Your business name, logo, and contact information.
- Client Information: Name, address, and contact details of the client.
- Invoice Number: A unique identifier for the invoice.
- Invoice Date: The date the invoice is issued.
- Due Date: When payment is expected.
- Description of Services: Detailed breakdown of the work performed, including quantities and rates.
- Subtotal: Total before taxes.
- Taxes: Any applicable tax amounts.
- Total Amount Due: Final amount owed by the client.
- Payment Instructions: How the client can pay you.
Step-by-Step Writing Guide for Your Invoice
- Gather Information: Collect all necessary details, including client info and the specifics of the job.
- Choose a Template: Start with a machinist invoice template. You can find free samples online or create your own.
- Fill in Details: Input the client’s information and job details, ensuring everything is accurate.
- Calculate Totals: Add up the costs for services and materials, including any taxes.
- Format Professionally: Use clear headings and a readable layout to make it easy for clients to understand.
- Send Promptly: Deliver the invoice as soon as the work is completed to ensure timely payment.
Realistic Invoice Example
Here’s a simple machinist invoice template snippet:
Your Business Name
Your Address
Your Phone Number
Your Email
Invoice Number: 001
Invoice Date: [Date]
Due Date: [Due Date]
Client Name
Client Address
Description of Services:
1. CNC Machining – Aluminum Parts (5 units @ $50 each) – $250
2. Material Costs – Aluminum Sheet – $100
Subtotal: $350
Tax (8%): $28
Total Amount Due: $378
Payment Instructions: Please make payments via bank transfer or check.
Common Mistakes to Avoid
- Not including all necessary details, which may confuse clients.
- Failing to send invoices promptly can delay payment.
- Overlooking tax calculations, which can lead to inaccuracies.
- Using unclear language or jargon that might confuse clients.
Tips for Customization
Make your invoice stand out by customizing it. Here are a few pointers:
- Add your business logo to enhance branding.
- Use colors that match your brand identity.
- Include a personalized note thanking the client for their business.
Creating a machinist invoice doesn’t have to be complicated. By following these guidelines and using the examples provided, you can ensure that your invoicing process is smooth and professional. This not only improves your cash flow but also helps you maintain great relationships with your clients. For more specialized templates, consider resources like lighting installation invoices or project-based invoices for different industries.
Practical Document Examples