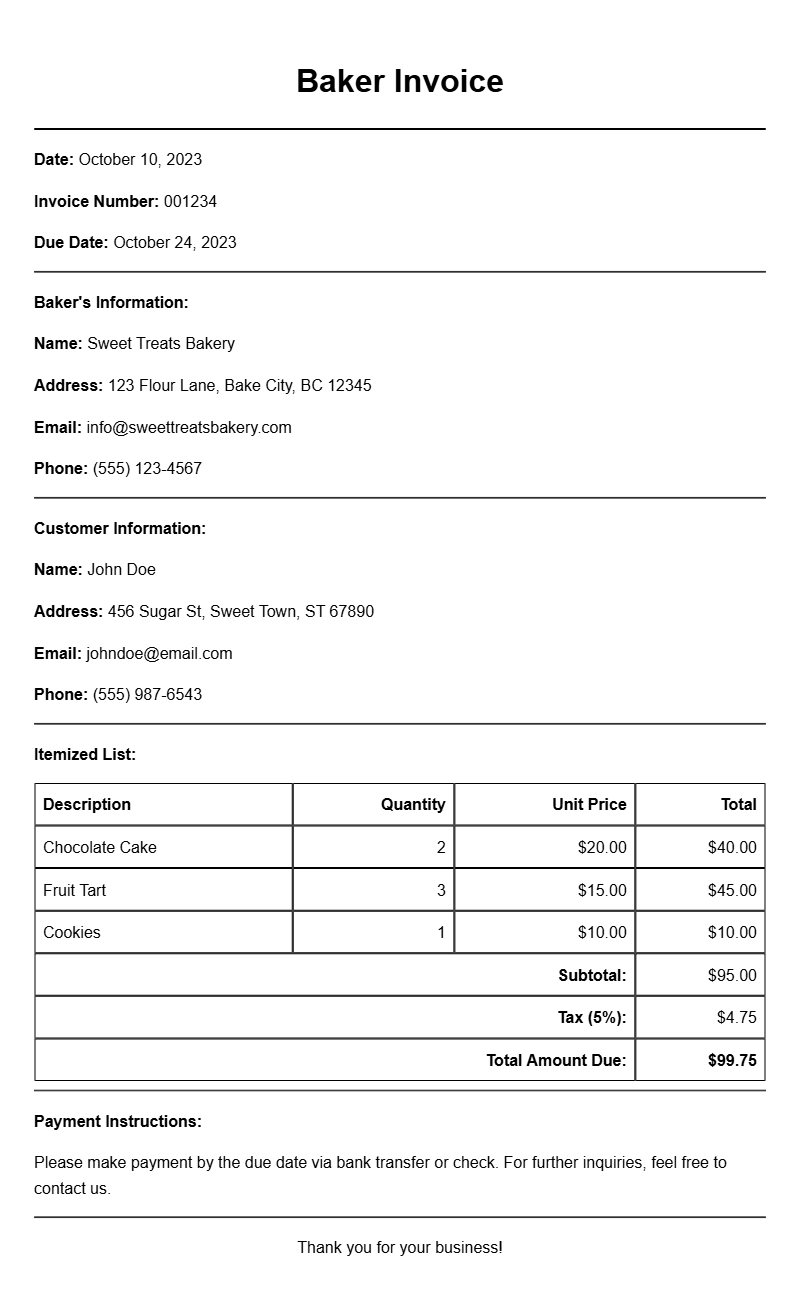
If you’re a baker running your own business, keeping track of sales and payments is vital. One effective way to do this is through a baker invoice. An invoice not only serves as a formal request for payment but also helps you maintain clear records for your business. In this article, we’ll explore what a baker invoice is, when to use it, its essential components, and provide examples and templates to help you get started.
WHAT IS A BAKER INVOICE?
A baker invoice is a document that details the goods or services provided by a bakery, along with the amount owed by the customer. It’s an essential tool for managing transactions, especially when dealing with wholesale orders, catering events, or custom cake requests. Having a professional-looking invoice helps establish credibility and ensures that you get paid on time.
WHEN IS IT USED?
You typically use a baker invoice when delivering baked goods to a customer, whether it’s a retail sale or a special order. This might include:
- Custom cake orders for events like weddings or birthdays
- Wholesale orders to local cafes or grocery stores
- Catering services for parties or corporate events
KEY COMPONENTS OF A BAKER INVOICE
A well-structured baker invoice should include several crucial components:
- Your Business Information: Include your bakery name, address, phone number, and email.
- Customer Information: Name and contact details of the customer.
- Invoice Number: A unique identifier for tracking purposes.
- Date of Issue: The date when the invoice is created.
- Itemized List of Products: Description, quantity, and price of each item sold.
- Subtotal and Total Amount: Clear breakdown of costs, including any taxes or discounts.
- Payment Terms: Specify when the payment is due and accepted payment methods.
STEP-BY-STEP WRITING GUIDE
Creating your baker invoice can be straightforward. Here’s a step-by-step guide:
- Gather Information: Collect all necessary details, including customer info and order specifics.
- Choose a Template: Start with a simple template to save time.
- Fill in Your Information: Add your business details at the top.
- Detail the Order: Clearly describe each item, quantity, and price.
- Calculate the Total: Add up the costs, including taxes.
- Review and Send: Check for accuracy before sending it to your customer.
REALISTIC EXAMPLES/TEMPLATES
Here’s a simple example of a baker invoice:
[Your Bakery Name]
[Address]
[Phone Number]
[Email]
Invoice To:
[Customer Name]
[Customer Address]
[Customer Phone Number]
Invoice Number: 001
Date: [Date]
Itemized List:
| Item Description | Quantity | Price | Total |
|———————-|———-|——–|———|
| Chocolate Cake | 1 | $30.00 | $30.00 |
| Vanilla Cupcakes | 12 | $18.00 | $18.00 |
| Cookies (Dozen) | 1 | $15.00 | $15.00 |
Subtotal: $63.00
Tax (8%): $5.04
Total Amount Due: $68.04
Payment Terms: Due within 30 days. Accepts cash, credit, or check.
COMMON MISTAKES TO AVOID
When creating invoices, here are some typical pitfalls to watch out for:
- Missing information like the invoice number or customer details.
- Not itemizing products, which can lead to confusion.
- Forgetting to include payment terms, making it unclear when payment is due.
- Using unclear language or jargon that customers might not understand.
TIPS FOR CUSTOMIZATION
Personalizing your baker invoice can make it more memorable. Consider these tips:
- Incorporate your logo to enhance branding.
- Use colors that match your bakery’s aesthetic.
- Add a thank you note or a special offer for repeat customers.
Creating a baker invoice is an essential part of running your baking business smoothly. By following these guidelines and utilizing templates, you can ensure your invoices are professional and effective. For more resources, check out related templates like rush service invoice templates or coding bootcamp invoice templates that can help streamline your invoicing process.
Standard Format & Layout Reference