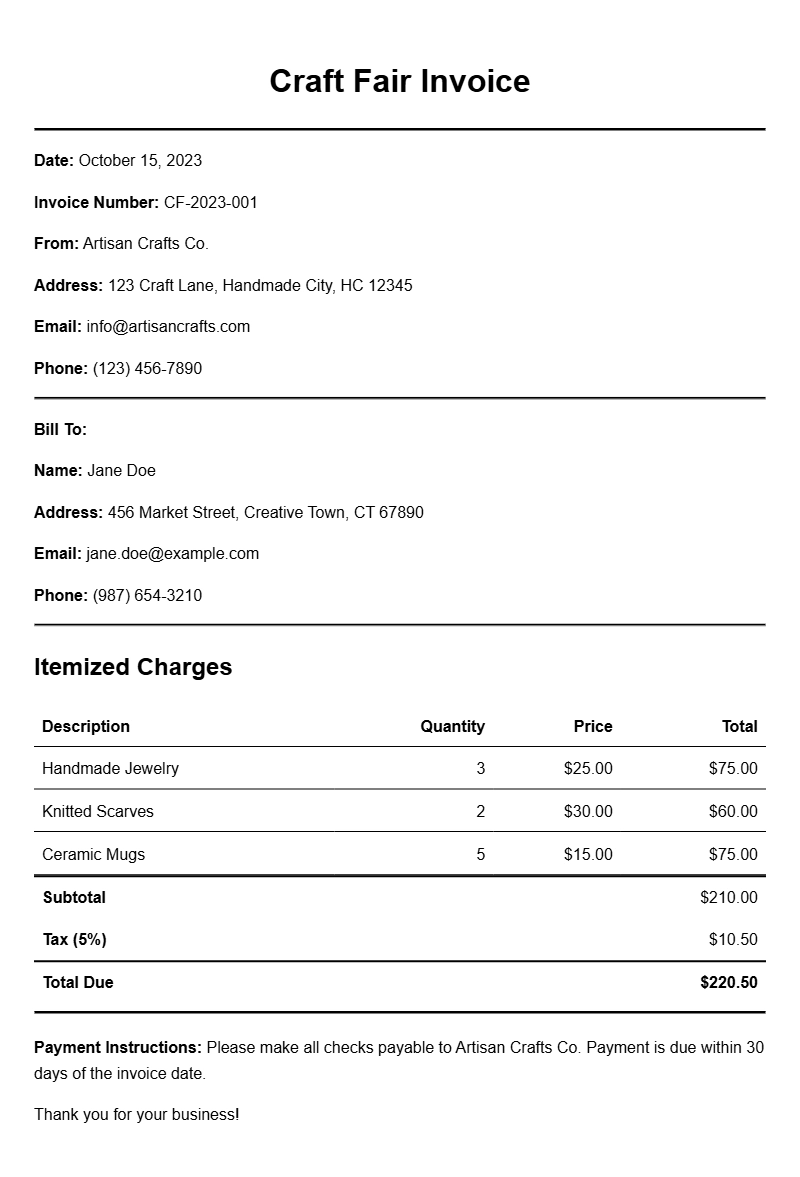
Craft fairs are a fantastic opportunity for artisans to showcase their work and connect with customers. However, managing the financial side can be tricky, especially when it comes to invoicing. Having a solid craft fair invoice sample can simplify this process and ensure that you get paid promptly. This guide will walk you through what a craft fair invoice is, when to use it, its key components, and how to create one that suits your style.
WHAT IS A CRAFT FAIR INVOICE?
A craft fair invoice is a document you provide to customers after they purchase your handmade goods at a craft fair. It outlines what was bought, the price, payment terms, and any applicable taxes. This invoice serves as a formal request for payment and helps keep your transactions organized.
WHEN TO USE A CRAFT FAIR INVOICE
Typically, you would use an invoice at the end of a sale, especially if the customer is buying multiple items or if you offer custom orders. It’s also useful for record-keeping purposes, both for you and your customers, making future transactions smoother.
KEY COMPONENTS OF A CRAFT FAIR INVOICE
- Your Business Information: Include your name, address, phone number, and email.
- Customer Information: Add the customer’s name and contact details.
- Invoice Number: This unique identifier helps with tracking.
- Date of Issue: The date when the invoice is created.
- Description of Items Sold: List each item, quantity, and price.
- Subtotal, Taxes, and Total Amount Due: Clearly display the total cost, including any applicable taxes.
- Payment Terms: Specify how and when you expect to be paid.
STEP-BY-STEP WRITING GUIDE
Creating your craft fair invoice can be straightforward. Follow these steps:
- Gather Your Information: Make a list of your business details and the items sold.
- Choose a Template: You can either create one from scratch or use a craft fair invoice sample as a base.
- Fill in the Details: Input all necessary information as discussed above.
- Review for Accuracy: Double-check all figures and details.
- Send It to Your Customer: Provide the invoice either as a printed copy or via email.
REALISTIC EXAMPLES/TEMPLATES
Here’s a simple template snippet to get you started:
Your Name
Your Address
Your City, State, Zip
Your Email
Your Phone Number
Invoice Number: 001
Date: [Insert Date]
Bill To:
Customer Name
Customer Address
Customer City, State, Zip
Description Quantity Unit Price Total
——————————————————-
Handmade Necklace 1 $25.00 $25.00
Wooden Coaster Set 2 $10.00 $20.00
Subtotal: $45.00
Sales Tax (8%): $3.60
Total Amount Due: $48.60
Payment Terms: Please pay within 15 days.
COMMON MISTAKES TO AVOID
- Not including your business information, making it hard for clients to reach you.
- Forgetting to number your invoices, which can lead to confusion.
- Not clearly stating payment terms, which could delay your payments.
TIPS FOR CUSTOMIZATION
Make your invoice reflect your brand. Here are a few tips:
- Use your brand colors and logo for a professional look.
- Consider adding a personal note or thank you message to customers.
- Adjust the layout to match your style, ensuring it remains clear and easy to read.
Craft fair invoices don’t have to be daunting. With a few simple components and a clear format, you can create an effective invoice that meets your needs. Remember to keep track of your sales and invoices to maintain a healthy business. For more insights on invoicing in various professions, check out our other resources like remodeling contractor invoice templates and arborist invoice templates.
Common Document Templates & Previews