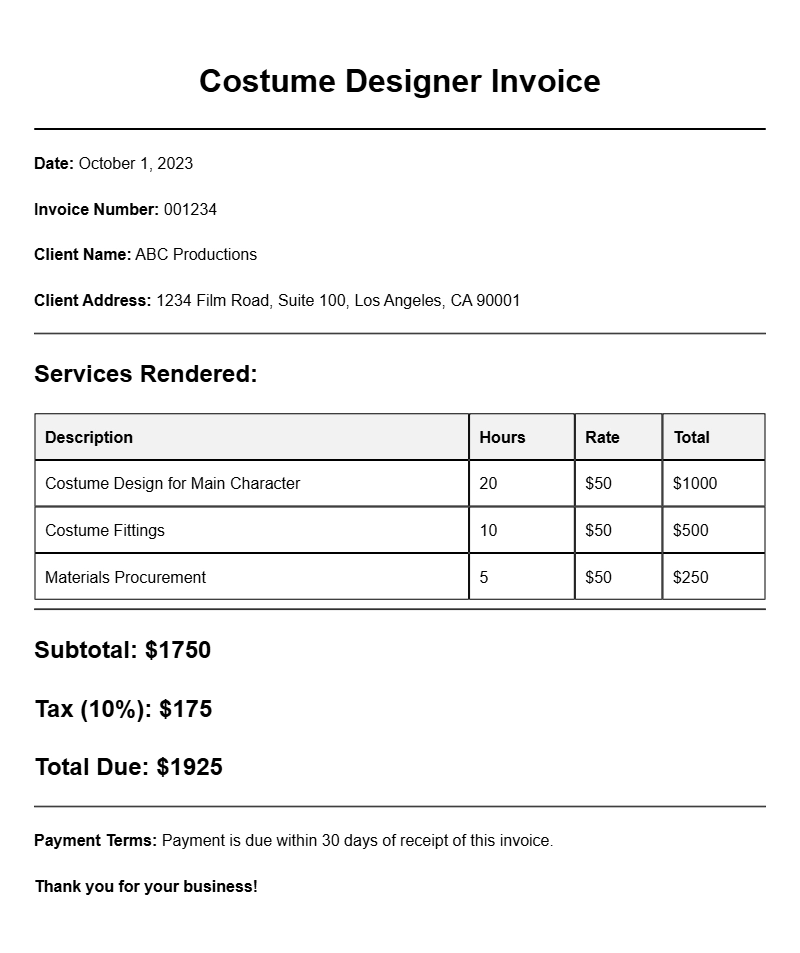
As a costume designer, managing your finances efficiently is just as important as bringing creative visions to life. One essential tool in your business arsenal is a well-crafted invoice. If you’re looking for costume designer invoice samples to guide your billing process, you’re in the right place. This article will break down what an invoice for costume design looks like, when you’ll need one, and how to create one that reflects your professionalism.
What is a Costume Designer Invoice?
A costume designer invoice is a document you send to clients outlining the services you’ve provided, along with the costs associated with those services. It serves as a formal request for payment and is crucial for keeping your finances organized.
When is it Used?
You’ll typically use an invoice after completing a project or reaching a milestone in your work. This could be after designing costumes for a theater production, a film shoot, or a special event. Sending an invoice ensures you get paid for your hard work and helps maintain a professional relationship with your clients.
Key Components of a Costume Designer Invoice
- Your Business Information: Include your name, business name (if applicable), address, phone number, and email.
- Client Information: Clearly state the client’s name and contact details.
- Invoice Number: A unique identifier for each invoice helps with tracking.
- Date of Issue: The date you send the invoice.
- Description of Services: A detailed breakdown of the costume design services provided.
- Costs: Itemized costs for each service, including labor, materials, and any additional fees.
- Payment Terms: Specify payment methods and due dates.
Step-by-Step Writing Guide
- Choose a Template: Start with a basic invoicing template that you can customize. You can find many free templates online or create one in Word or Excel.
- Fill in Your Information: At the top of the invoice, include your business details and the client’s information.
- Number and Date: Assign an invoice number and add the date of issue.
- Describe Your Services: List the costume design services provided, ensuring you include enough detail for clarity.
- Calculate Totals: Add up the costs for each service. Include any taxes or additional fees.
- Set Payment Terms: Clearly state how and when you would like to be paid.
Realistic Examples/Templates
Here’s a simple template snippet for your reference:
Your Name
Your Business Name
Your Address
Your Phone Number
Your Email
Client Name
Client Address
Invoice #: 001
Date: [Insert Date]
Description of Services:
– Costume Design for [Project Name]: $[Amount]
– Fabric Purchase: $[Amount]
– Additional Costs: $[Amount]
Total Due: $[Total Amount]
Payment Terms: Payment due within 30 days via [Payment Method].
Common Mistakes to Avoid
- Forgetting Details: Ensure all information is accurate and complete.
- Vague Descriptions: Provide clear descriptions of services to avoid confusion.
- Neglecting Payment Terms: Always specify due dates and accepted payment methods.
Tips for Customization
Tailor your invoice to reflect your brand. Use your business colors, logo, and fonts to create a cohesive look. Consider adding a personal touch, like a thank you note or a small discount for early payment, to build rapport with your clients.
Creating a professional invoice is a straightforward process that can significantly impact your cash flow. By using the right templates and customizing them to fit your unique style, you can ensure that you get paid on time and maintain a professional image in the costume design industry. For those looking for more specialized invoices, check out some resources on seminar invoices, wedding invoices, or nail technician invoices. Happy invoicing!
Template Variations & Sample Formats