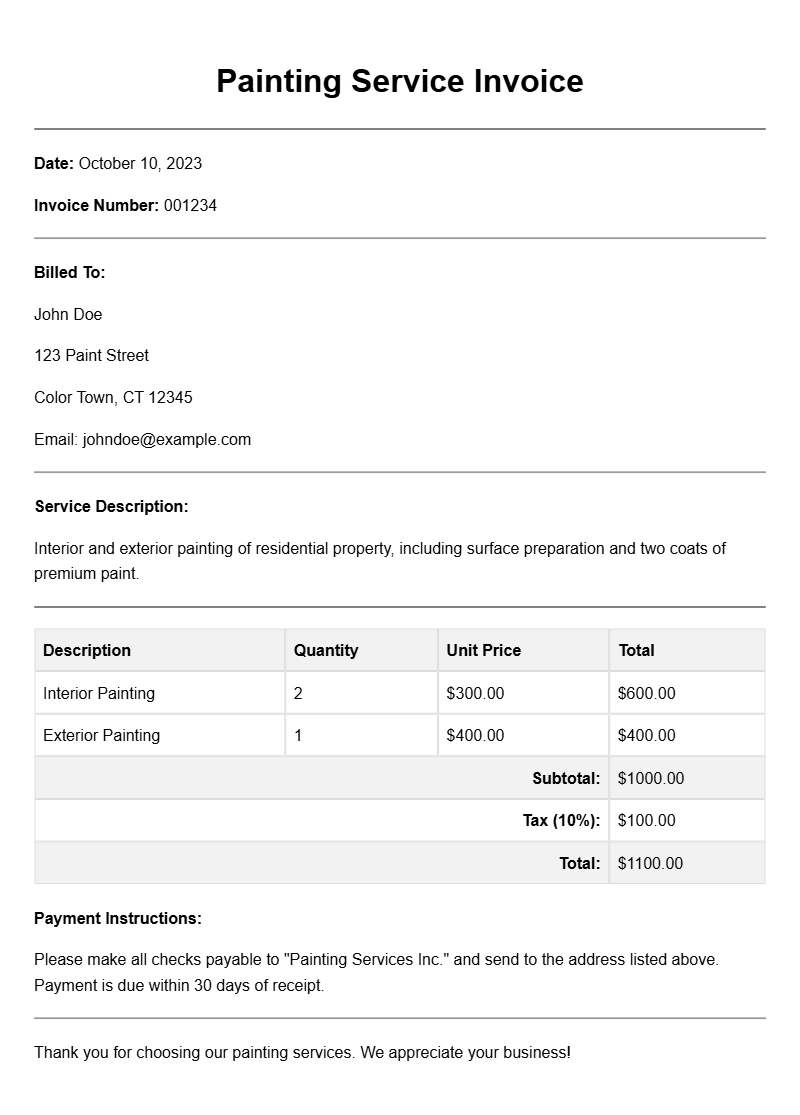
Creating a painting service invoice can feel overwhelming, especially when you’re managing multiple projects and clients. A well-structured invoice not only helps you get paid on time but also reflects your professionalism. In this article, we’ll dive into painting service invoice templates, how to use them effectively, and what to include so you can streamline your invoicing process.
WHAT IS A PAINTING SERVICE INVOICE TEMPLATE?
A painting service invoice template is a pre-designed document that allows painting contractors to bill clients for their services. It typically includes details about the work completed, the cost, and payment terms. Using a template saves time and ensures consistency in your billing process.
WHEN TO USE A PAINTING SERVICE INVOICE TEMPLATE
You should use an invoice template after completing a job or when you reach a milestone in a larger project. For instance, if you’ve just finished painting a client’s living room, it’s the perfect time to send an invoice detailing the work done and the amount due. This helps maintain clear communication about payments and keeps your cash flow steady.
KEY COMPONENTS OF A PAINTING SERVICE INVOICE
- Contact Information: Include your name, business name, address, phone number, and email. Don’t forget the client’s details as well.
- Invoice Number: Assign a unique number to each invoice for tracking purposes.
- Date: Clearly state the issue date and the due date for payment.
- Description of Services: Provide a detailed list of the painting services rendered, including any materials used.
- Cost Breakdown: Include the cost for each service and any applicable taxes.
- Total Amount Due: Clearly state the total amount the client owes.
- Payment Terms: Specify how and when you expect to be paid, along with any late fees if applicable.
STEP-BY-STEP GUIDE TO WRITING A PAINTING SERVICE INVOICE
- Choose a Template: Start with a basic template that fits your style.
- Fill in Your Information: Add your business and client details at the top.
- Add Invoice Number and Dates: Make sure each invoice is numbered and dated.
- Describe Your Services: Write clear and concise descriptions for each task performed.
- Calculate Costs: List each service with its price and sum it up for the total.
- Include Payment Instructions: Make it easy for your client to know how to pay you.
- Review and Send: Double-check for accuracy before sending it off.
REALISTIC EXAMPLES OF PAINTING SERVICE INVOICES
Here’s a simple template snippet to get you started:
—————————————–
Your Business Name
Your Address
Your City, State, Zip
Your Phone Number
Your Email
Invoice Number: 001
Date: [Insert Date]
Due Date: [Insert Due Date]
Client Name: [Client’s Name]
Client Address: [Client’s Address]
Description of Services:
– Interior Painting (Living Room): $300
– Exterior Touch-Up: $150
– Materials: $50
—————————————–
Total Amount Due: $500
Payment Terms: Due upon receipt
—————————————–
COMMON MISTAKES TO AVOID
- Not being detailed enough: Always provide enough detail about the services to avoid confusion.
- Forgetting to include payment terms: Clear payment instructions can prevent delays.
- Overlooking follow-up: If payment isn’t received by the due date, don’t hesitate to send a polite reminder.
TIPS FOR CUSTOMIZATION
Feel free to modify your invoice template to reflect your brand. Add your logo, choose colors that match your business, and even include a personal touch like a thank-you note. Customization not only makes your invoices more appealing but also reinforces your brand identity.
By using a painting service invoice template, you can simplify your billing process and ensure timely payments. Remember, a well-organized invoice sets the tone for a professional relationship, so invest the time to get it right. If you need more inspiration, check out some examples tailored for different services, like mural artists or carpet cleaners. Happy invoicing!
Document Examples & Template Samples